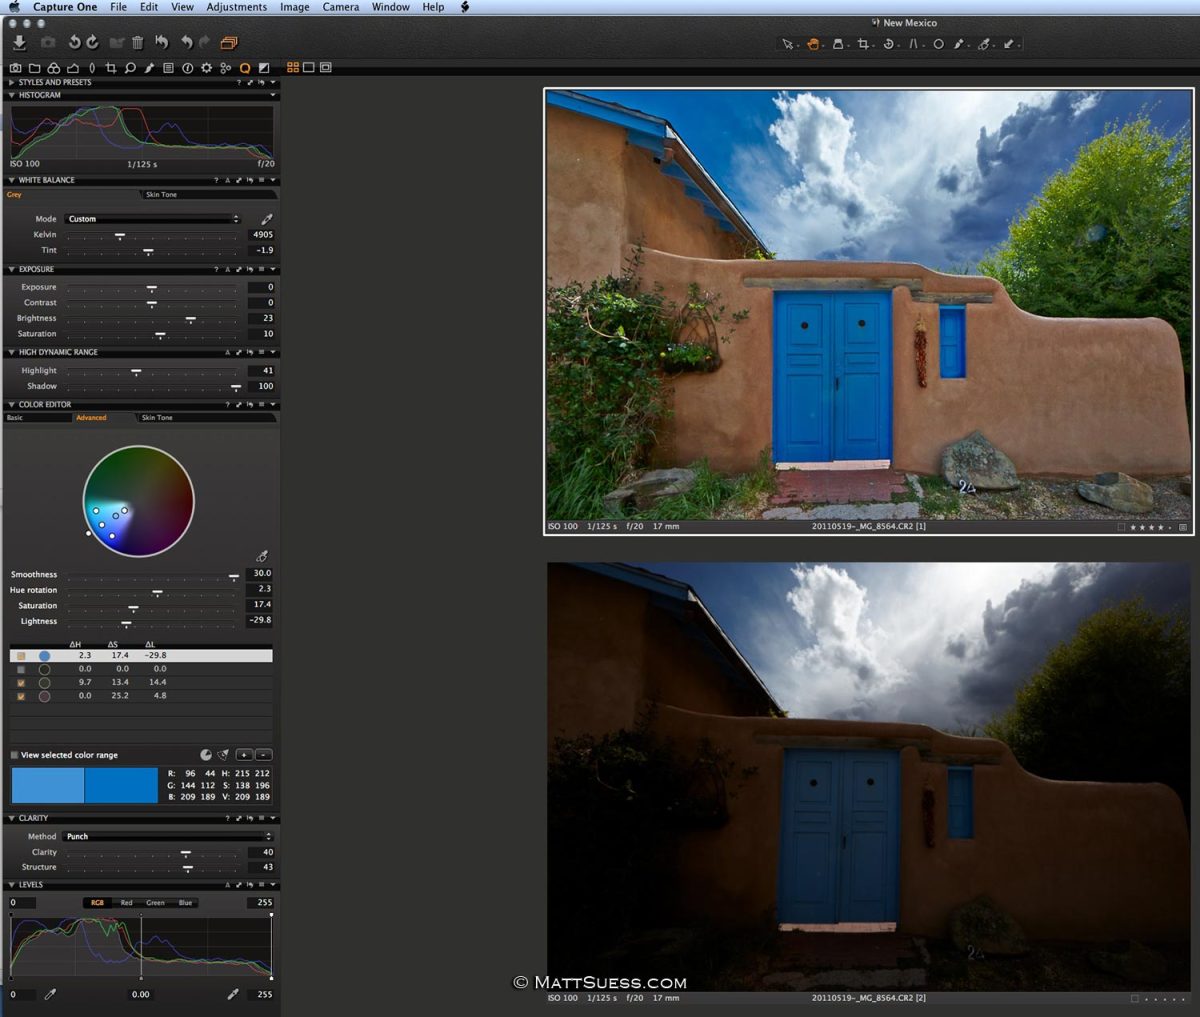
Photographing fall foliage using HDR techniques can be quite challenging.
Hundreds to thousands of tiny leaves and branches dance and move in even the slightest of breezes. Using a small aperture for maximum depth of field means using slow shutter speeds, potentially causing blur and additional leaf and branch movement.
Combining these multiple exposures – even with the best of ghost reduction in your favorite HDR program – can often cause errors and problems that can sometimes be seen even without zooming in. Sometimes these effects can be minimized by maxing out the ghost reduction, although at the expense of increased halo’s.

But often the dynamic range of the scene being photographed – especially with sunlight shinning on the tops of the trees and shade covering the forest floor – can be too large for a camera to capture in one shot – that is unless you are shooting RAW and using Capture One Pro 7.
Here is how to get a natural HDR look from just a single image with the RAW converter Capture One Pro 7 from Phase One.

I have been amazed at the natural HDR type look I can get in C1 from just a single, normally exposed frame. I have been able to pull out shadows I thought were completely lost and keep highlights in-check at the same time with their High Dynamic Range (HDR) tool – even when maxing out the shadow slider!!
But to take advantage of all of the information your camera captures you are going to need to shoot in the RAW file format – jpg’s just won’t cut it here. And shoot at the lowest ISO possible. Bringing up the shadows can increase noise, but if you shoot at a low ISO most – if not all – of that noise can be eliminated using the Noise Reduction Tools in C1.
If you shot a typical 3-exposure or 5-exposure series, start with the middle exposed image. This middle exposure is usually one that will have dark shadows, but highlights are not or are barely clipped. Then use the HDR tool in C1 and crank your Shadows slider to the far right until you start getting enough detail in your shadows.

Next adjust your Highlights in the HDR tool, making sure you are not clipping any bright areas. If you find you are, try using the next darkest exposure.
Once you have your Highlights and Shadows adjusted, finish off the photo by making appropriate adjustments to your exposure, contrast, brightness, saturation, clarity, etc.
Next zoom in to look for any added noise in your image, especially in the shadows you just brought out. Make necessary adjustments using the noise reduction tools.

By now you should have a pretty decent looking image, but it still may need more work and might still need more shadows lightened. You can try making adjustment masks in C1 to adjust for that, or you can at this point export the image and open in Photoshop or Perfect Photo Suite or even into HDR Efex Pro 2 to finish off your enhancements.
I think you will be just as amazed as I am with how much detail can be found in a single RAW image with C1 without the hassle of using HDR software and having to try to correct errors brought on by ghost reduction. For clean and natural looking HDR type images all you may need is a single exposure and Capture One Pro 7.

